Scope of supply
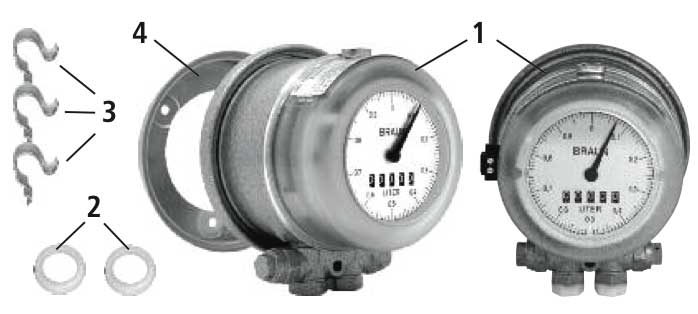
- HZ 3 oil meter or HZ 3 RR oil meter
- Lip sealing ring (2 off)
- Clamps (3 off)
- Mounting plate
- Mounting instructions
Purpose
The oil meter may only be used for measuring the consumption of heating oil (EL).
Mounting
- Check measuring device and accessories for completeness and the required operating and ambient conditions (-> see section:”Technical data”).
- Adapt the pipe line as appropriate. The measuring unit must be easily accessable!
- In case of supply systems without pumps the intake height must be at least 1m!
- Installing the oil meter on the suction side, a filter must be installed in front of the oil meter with a mesh size of 50- 75 μ. Air inclusions must be avoi- ded since they cause measu- ring errors. If necessary the pipeline system or the scre- wed connections should be checked for tightness.
- Clear any swarf and other conta- mination from the lines.
![Fasten the mounting plate [4].](https://braunmesstechnik.de/wp-content/uploads/2019/12/hz3_montageplatte.jpg)
4. Attach retaining plate [4].
- The side or bottom connec- tions can be selected.
- The meter must always been installed in an upright position and the seal on the counter cap must always be on top.

5. Remove sealing plugs and screw in screwed plugs [6] with cylindrical threads.
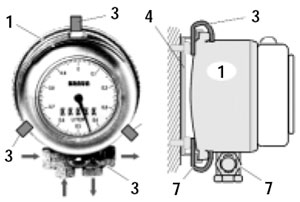
- Do not mix up the inlets and outlets!
- The lip sealing rings supplied [2] must be used for sealing the screwed pipe connec- tions!
6. Attach oil meter [1] to the mounting plate [4] using the clamps [3].
7. Tighten up the screwed connec- tions. Thereby hold the connecting piece [7] still with an SW 19 spanner.
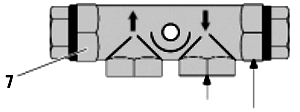
During assembly hold here.
Safety advice

Before mounting the oil meter these instructions must be carefully read through and followed!

Danger of fire from combustible liquids! Take great care during grinding, cutting and welding work!

Fires, open lights and smoking are forbidden! Always keep fire extinguisher ready for use!

Danger of injury from sharp edges! Be careful during mounting!

Danger of crushing! The falling measuring unit can crush feet!
Starting up
![]() Where no pump is fitted to the supply system: Open valve and bleed air completely from system.
Where no pump is fitted to the supply system: Open valve and bleed air completely from system.
![]() In the case of pressurized systems: switch on pump, open shut-off valve and bleed air from the system.
In the case of pressurized systems: switch on pump, open shut-off valve and bleed air from the system.
- Avoid pressure surges so as not to damage the measuring unit.
- Entrapped air causes false measured results and can lead to damage!
The counter can be read as follows:
![]() One revolution of the pointer equals 1 l. After that, it will switch to the counter wheels. Full litres can be read from the wheels and the pointer position gives the decimal places.
One revolution of the pointer equals 1 l. After that, it will switch to the counter wheels. Full litres can be read from the wheels and the pointer position gives the decimal places.
Maintenance
![]() Reguarly clean the preconnected filter!
Reguarly clean the preconnected filter!
![]() Check connections and lines for leaks!
Check connections and lines for leaks!
The measuring unit must be kept clean but requires no maintenance.
Calibration
In case of calibrated HZ 3 oil meters, calibration is valid for 10 years. Thereafter the oil meter can be recalibrated by the manufacturer.
Identification of the HZ3 calibrated oil meter:
![]() Registration no. 5.223/92.02 and “Class 1” on company name plate
Registration no. 5.223/92.02 and “Class 1” on company name plate
![]() Manufacturing number starts from 500.000 and increases
Manufacturing number starts from 500.000 and increases
Domestic calibration:
![]() The calibration expiry date is stamped on the lead seal
The calibration expiry date is stamped on the lead seal
EEC initial calibration:
![]() The date on which the counter was calibrated is stamped on the lead seal.
The date on which the counter was calibrated is stamped on the lead seal.
Technical Data
| Durchflussbereich (MID Richtlinie 2004/22/EG) | 0,18 … 30 l/h |
|---|---|
| Durchflussbereich max. (werksgeprüfte Ausführung) | 30 l/h (25 kg/h) |
| Ablesemöglichkeit am Ölzähler | 0,01 l … 99999,99 l |
| Messgenauigkeit | ±1 % |
| Nenndruck | 6 bar |
| Druckverlust | 0,05 bar … 0,1 bar |
| Heizölsorte | EL nach DIN 51603 |
| Temperaturbereich / Umgebungstemperatur | –5°C … +70°C |
| Anschlussgewinde | DIN 3852-X-G 1/4″ |
| Ofenleistung/Brennerleistung | 1,65 kW … 265 kW |
| Gewicht | 1,25 kg |
Installation Options
ZÖV (Central Oil Supply)
![]() readable on the tank
readable on the tank
![]() readable in front of the burning point
readable in front of the burning point
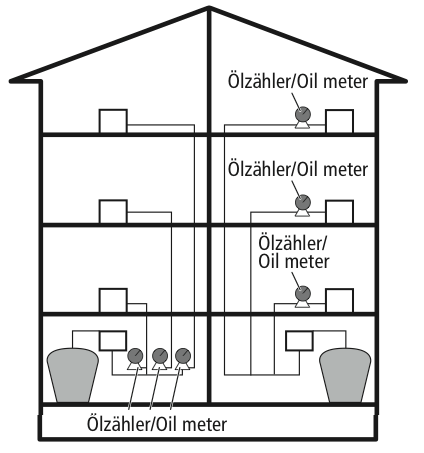
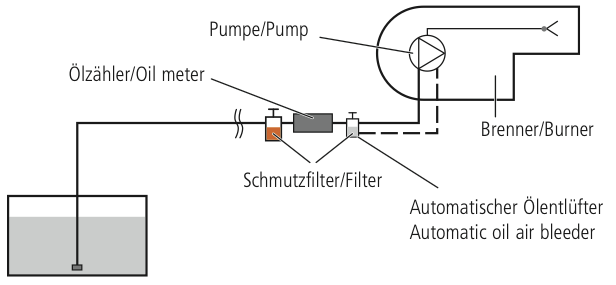
One-pipe system installation in suction line
